1.8 Device setup
With the sat-nms M&C software, the assignment which type of device is controlled by which communication interface and which driver is free configurable. The user interface of the software provides a configuration window which enables the authorized operator to setup devices.
When an operator is going to configure an MNC first it is important to understand, that with the sat-nms software each interface is bound to a communication protocol. The communication protocol used for a certain device is not unchangeably linked to the device driver. This is to support multiple devices being controlled via a single interface. Devices using a common 'multi drop' capable protocol may be connected to the MNC with a serial but like RS485.
Once an interface (serial port or network) has been included into the setup and got a communication protocol assigned to it, within the setup devices can be attached to this interface. With the device definition, the device gets a name and a device driver assigned to it. The device's name acts as an address within the software where to send at commands (equipment settings) to, the device driver tells the software how to treat the device at a low communication level.
To configure device first select the MNC:
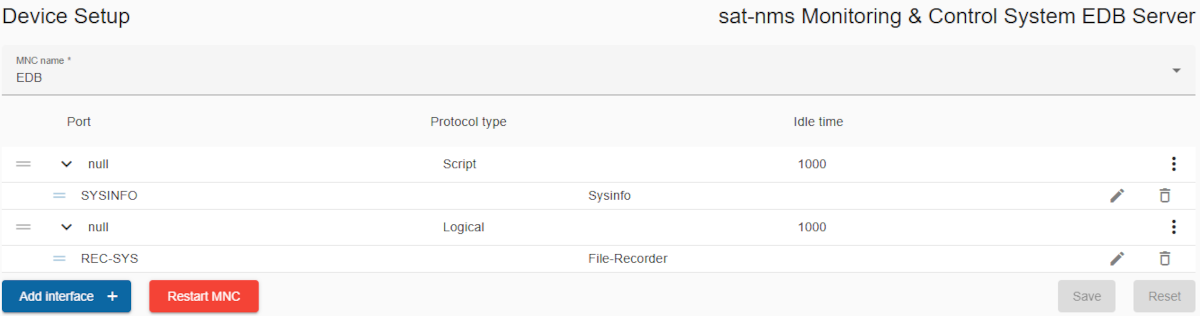
MNC name: Select an MNC to load devices and start editing.
This will show a list of all already configured interface and their attached devices.
The first level of this tree represents the interface.
- Port: Displays the name of the port or node.
- Protocol Type: Indicates the protocol associated with the entry.
- Idle Time: Shows the idle time for the specific entry (in milliseconds).
One or more devices can be attached to one interface.
- Parent node/Interface These are the primary entries that may have child nodes/devices nested under them. Parent nodes or interfaces are identified by a dropdown arrow (▼) on the left side of the row, allowing you to expand or collapse their child nodes.
- Drag Handles: Located on the left of each row (indicated by the three horizontal lines). Users can drag and drop rows to rearrange the list dynamically. But parent nodes/interfaces cannot be moved into another interface. At the bottom of the page, the snack bar (error) would be displayed with the description of the error, as shown below.

Expandable/Collapsible Rows = Interfaces
Rows with sub-items have a toggle arrow on the left side. Clicking the arrow expands or collapses the child node or devices.
- Context Menu: Accessible via the three-dot icon on the right of each row, provides the following options:
- Add Interface Below: Inserts a new interface directly below the selected interface.
- Add Device: Adds a new device as a child node under the selected interface.
- Edit Interface: Opens a dialog to modify the details of the selected interface.
- Delete Interface: Removes the selected interface and all its devices from the list.
Child Nodes = Devices These are nested entries directly associated with a parent node or interface. Child nodes or devices are indented beneath their respective parent node or interface to visually indicate the hierarchy.
- Drag Handles: Located on the left of each row (indicated by the three horizontal lines). Users can drag and drop rows to rearrange the list dynamically. However, devices cannot be moved from one interface to another interface. At the bottom of the page, the snack bar (error) would be displayed with the description of the error, as shown below.

- Device name: Name of the near the drag handel
- Device driver: Next to device name is device driver.
- Edit device: If you click on the pencil icon on the right-hand side, you can edit the device details.
- Delete device: Click the trash icon on the right hand side to delete an device from list.
Functions
- Add interface: Found at the bottom left of the editor. Clicking this opens a dialog to add a new interface to the list.
- Restart MNC: Clicking this button will restarts the selected MNC. Of course only after your confirmation via dialog. You must do this, to make the target system use a modified equipment setup.
- Save: Saves all changes made in the editor. If you have not saved the changes and accidentally leave the editor, a confirmation dialog will appear in which you must give your consent to leave the editor/page.
- Reset: Discards all unsaved changes and reverts to the first loading state.