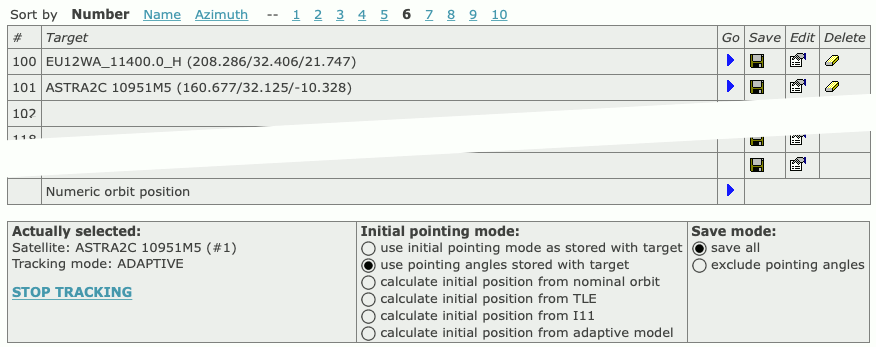
The page ‘Targets’ gives access to the ACU’s target memory. The ACU
is capable to remember the pointing (and tracking parameters, if the ACU
has the tracking module installed) of up to 199 satellites. Managing
these memories is done with the ‘Targets’ page. Target memories are
organized in 10 pages with 20 memory places each, you may click to the
numbers shown above the table to select a certain page. Additionally,
the target memories may be sorted either by target number, by azimuth
angle or by name. Click to the sort modes above the table to select the
appropriate sort mode.
target.gif
Below the target table the ACU shows the actually selected target,
the initial pointing mode to be used with the next Go
command anf the save mode.
Actually selected: This displays the name and
number of the actually tracked satellite as well as the currently active
tracking mode. If the antenna is tracking, a STOP_TRACKING label is
shown, permitting to stop tracking before moving to another satellite
without leaving this page. The Actually selected: field
may be empty if the Antenna has been moved since a target has been
selected.
Initial pointing mode: With this selection you may
overwrite the initial pointing mode stored with a target. With the next
Go command the selected initial pointing is executed
unless you have made the selection ‘use initial pointing as stored with
target’.
Save mode: The selection in this field affects the
next Save command.
save all — Saves all actual tracking settings and
the content of the tracking memory to the selected target number. This
includes the actual pointing angles as the angles stored with the
target.
exclude pointing angles — Saves the actual tracking
settings and the content of the tracking memory to the selected target
number as well, but leaves the pointing angles stored with the target
unchanged. You may want to use this option to update a target memory
without replacing the center of box position by the actual pointing
angles.
The target table itself displays 20 of the stored target memories. By
clicking the icons in the table, settings may be stored, recalled or
deleted:
Go — If a memory location has stored a pointing,
the table shows a blue arrow in the ‘Go’ column of the table. Clicking
to this arrow recalls the settings stored for that target as well as the
stored tracking data for this satellite and moves the antenna to
position according to the selected initial pointing mode. After the
antenna has reached this position, the tracking mode stored with the
target gets activated. The ACU displays a confirmation dialog before it
actually recalls the target memory. Only if you click to ‘Submit’ in
this dialog, the antenna moves to the stored location. With ADAPTIVE
tracking, the ACU uses the stored tracking data to calculate a model as
soon as tracking ist started as long as the stored tracking data is not
outdated.
Save — For each memory location the table shows a
floppy disk icon in the ‘Save’ column. Clicking to this icon saves the
actual tracking parameters, the tracking memory and - if at the bottom
of the page Save mode is set to save
all - also the actual antenna pointing to the selected memory
location. Again, there is a confirmation dialog page before the data
actually is saved.
Edit — For each memory location the table shows a
document edit icon in the ‘Edit’ column. Clicking to this icon opens the
target editor page for this target memory. With this editor you can edit
the stored parmeters in a target memory without actually applying them.
Chapter 5.8 Target Editor describes this function
more detailled.
Delete — Analogous to the ‘Save’ icon, the table
shows an eraser icon in the ‘Delete’ column. The icons only are shown
for the memory locations which are in use. Clicking to the eraser icon
clears the selected memory location after a confirmation inquiry.
Numeric orbit position — The table contains an
additional row at the bottom labeled ‘Numeric orbit position’. Clicking
to the blue arrow icon in this row opens a dialog where you are
requested to enter the orbit position of a satellite you want the
antenna to point to. After you pressed ‘Submit’ in this dialog, the ACU
computes the antenna pointing for the orbit position you entered and
immediately moves the antenna to the calculated
position. To make this function work satisfactory, it is necessary to
have the geodetic location of the antenna entered at the Setup page with a sufficient accuracy.