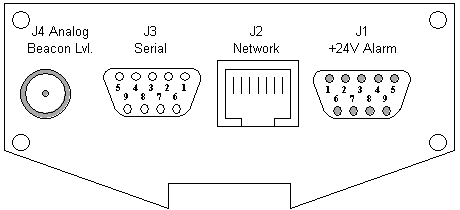
The connectors of the receiver are placed on both sides. One side contains the D/C and Data connectors, the other side the RF connectors. When you connect the receiver, please consider the following:
D/C and data connectors
The D/C and data connectors of the receiver all are located at one of the side panels of the enclosure. The figures below illustrate location of connectors and the pin out.
| J3 | pin no. | RS232 serial interface, DCE, (SUB-D 9P socket) |
|---|---|---|
| 1 | RS422 Streaming output (+) | |
| 2 | TxD (output) | |
| 3 | RxD (input) | |
| 4 | internally bridged to pin 6 | |
| 5 | GND | |
| 6 | internally bridged to pin 4 | |
| 7 | internally bridged to pin 8 | |
| 8 | internally bridged to pin 7 | |
| 9 | RS422 Streaming output (-) |
| J1 | pin no. | Power supply and alarm contacts (SUB-D 9P pin) |
|---|---|---|
| 1 | Power supply +24V | |
| 2 | Power supply +24V | |
| 3 | not connected | |
| 4 | GND | |
| 5 | GND | |
| 6 | Fault relay (120V D/C, 100mA max.) | |
| 7 | Fault relay | |
| 8 | Level fault relay (120V D/C, 100mA max.) | |
| 9 | Level fault relay |
| J4 | Beacon level 0..10V (SMA female) |
|---|---|
| not used by the LBRX-1MT |
| J2 | Ethernet 10Base-T, (RJ45) |
|---|---|
| not used by the LBRX-1MT |
RF connectors
The other side panel of the enclosure contains the RF connectors. These are the RF input which may be configured to inject a LNB supply voltage of 14 or 18 Volts and the RF output which loops through the input signal.
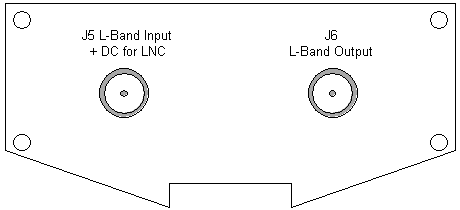
| J5 | RF Input (SMA female) |
|---|---|
| J6 | RF Output (SMA female) |
|---|---|