2.2 Setting the IP Address
Before you can operate the beacon receiver, you need to set the receiver's IP address. There is a special configuration program on the documentation CD shipping with the receiver for this purpose. We recommend to configure the receiver's TCP/IP settings before you install the receiver at it's final place. To configure the receiver, the following equipment is required:
- The sat-nms LBRX beacon receiver itself
- A 24V D/C power supply
- A Computer running a Microsoft Windows operating system equipped with CD-ROM drive and Ethernet network card.
- A CAT5 crossover network cable or a Ethernet hub and standard network cables to connect the beacon receiver and the computer.
- The CD-ROM shipping with the sat-nms receiver.
Setting the receivers IP parameters now is easily done within a few minutes.
- First install a network cable between the receiver and your computer. If you have a crossover cable available, this is very easy: simply put the cable into the network connectors of computer and beacon receiver. Without a crossover cable, you need to connect both, the computer and the beacon receiver to the same network hub using two standard network cables. It is essential, that the computer and the receiver are connected to the same network segment, the configuration program is not able to find the beacon receiver through routers or network switches.
- Now power on your computer and connect the beacon receiver to the 24V D/C supply.
- Insert the CD-ROM into the computer's drive and inspect it's contents through the 'My Computer' icon on your desktop. Double-click to the 'ChipTool.exe' program in the 'ChipTool' directory.
- When the ChipTool program is running, type CTRL+F to make the program search the beacon receiver. The program shows a list containing at least one entry describing the actual network parameters of the receiver.
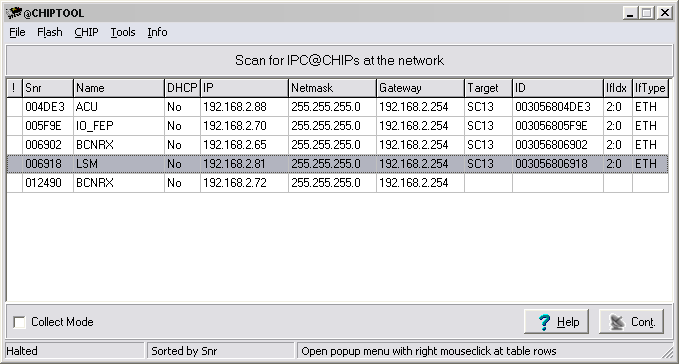
- The serial number shown in the first column of the list, must match the serial number printed on the receiver's enclosure. If the list stays empty, the beacon receiver is not connected properly. If there are more entries in the list, the configuration program has found other devices in this network segment which use the same technology.
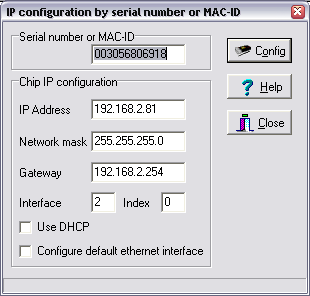
- Now type CTRL+I to open the IP configuration window of the program. In this form enter the receiver's serial number, it's new IP address and network mask. If the receiver later shall be operated through a router, enter the address of the router on the gateway field, otherwise leave this field blanc. Be sure, that the 'DHCP' mark is unchecked. Finally click to the 'Yes' button to set the new parameters at the beacon receiver.
Now the IP configuration of the receiver is completed. You may finally want to test if the beacon receiver is reachable now. Start your web browser and type the receiver's IP address into the URL field of the browser. The beacon receiver should reply with it's main page, provided that the receiver and your computer are configured for the same subnet.