2.3.1 LBRX DIN Rail module
The connectors of the receiver are placed on both sides. One side contains the DC and Data connectors, the other side the RF connectors. When you connect the receiver, please consider the following:
- The fault relays at J1 are Photo MOS solid state circuits. In fault state or while the unit is powered off they are in hi-Z state (several MOhms). A resistance below 25 Ohms indicates that the function is OK. Relay 1 indicates a power supply and synthesizer fault. Relay 2 indicates a level threshold or frequency track fault. To meet mentioned EMC standards, use double shielded twisted pair CAT7 S/FTP Network cable, e.g. DRAKA UC900 SS27 Cat.7 PUR. Take care, that cable shielding is connected properly.
- J2 is the Ethernet 10/100Base-T / RJ45 connector. Use a standard network cable to connect the receiver to an Ethernet hub. If you want to connect your computer and the receiver directly without using a hub, you need a crossover cable for this with swapped RX/TX lines. To meet mentioned EMC standards, use double shielded twisted pair CAT7 S/FTP Network cable, e.g. DRAKA UC900 SS27 Cat.7 PUR. Take care, that cable shielding is connected properly.
- J3 is a standard 9-pin RS232 (DCE) connector. You may use a direct 9-pin cable to connect a PC to the beacon receiver. The RTS/CTS and the DTR/DSR lines are bridged in the receiver to simulate hardware handshaking. They need however not to be connected, if you want to use a 3 wire cable. To meet mentioned EMC standards, use double shielded twisted pair CAT7 S/FTP Network cable, e.g. DRAKA UC900 SS27 Cat.7 PUR. Take care, that cable shielding is connected properly.
- The RF input J5 may be configured to power a LNB. If you intend to connect the receiver to a signal source which may not be able to withstand the LNB supply voltage, be sure to switch off the LNB supply at the receiver by means of the web based user interface before you connect the receiver input! To meet mentioned EMC standards, use double shielded coaxial cable, e.g. RG223. Take care, that cable shielding is connected properly.
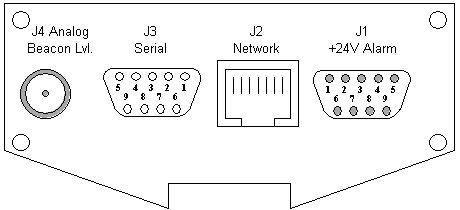
DC and data connectors
The DC and data connectors of the receiver all are located at one of the side panels of the enclosure. The figures below illustrate location of connectors and the pin out.
|
1 |
Power supply +24V |
|
2 |
Power supply +24V |
|
3 |
not connected |
|
4 |
GND |
|
5 |
GND |
|
6 |
Power Supply/Synthesiser fault relay (48V DC, 100mA max.) |
|
7 |
Power Supply/Synthesiser fault relay |
|
8 |
Level/Frequency track fault relay (48V D/C, 100mA max.) |
|
9 |
Level/Frequency track fault relay |
|
1 |
not connected |
|
2 |
TxD (output) |
|
3 |
RxD (input) |
|
4 |
internally bridged to pin 6 |
|
5 |
GND |
|
6 |
internally bridged to pin 4 |
|
7 |
internally bridged to pin 8 |
|
8 |
internally bridged to pin 7 |
|
9 |
not connected |
| J2 |
Ethernet 10Base-T, (RJ45) |
| J4 |
Beacon level 0..10V (SMA female) |
RF connectors
The other side panel of the enclosure contains the RF connectors. These are the RF input which may be configured to inject a LNB supply voltage of 14 or 18 Volts and the RF output which loops through the input signal.
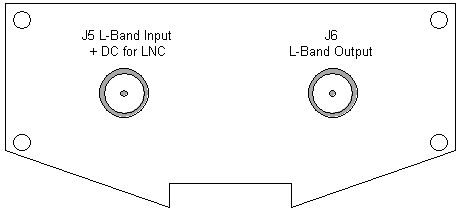
| J5 |
RF Input (SMA female)J6RF Output (SMA female) |