2.3.2 RMC Pin Descriptions
CON1 I2C/Key Interrupt
CON1 is the connector to the on-board I2C-Bus and a Key Interrupt input. This port is to connect an external Handheld. Actually this connector is not used and cabling is not required.
| 1 |
+5V |
Power supply |
OUT |
| 2 |
GND |
Power supply |
|
| 3 |
Key Interrupt |
TTL-level |
IN |
| 4 |
SCL |
I2C-bus |
I/O |
| 5 |
SDA |
I2C-bus |
I/O |
| 6 |
GND |
Signal ground |
|
CON2 Temperature Monitor
CON2 provides four inputs for NTC-Temperature-Sensors. Connect only the temperature-sensor which belongs to the described measurement point. This is necessary for a correct function of the RMC. If you don't need a measurement point, leave it open. But be careful, if you select two or three RX-Channels in the software, you have to connect at least the temperature-sensor for the RX 2 reference load because of the RMC temperature control.
| 1 |
TEMP 17 out |
RX 2 reference load |
OUT |
| 2 |
TEMP 17 in |
|
IN |
| 3 |
TEMP 18 out |
RX 2 noise source |
OUT |
| 4 |
TEMP 18 in |
|
IN |
| 5 |
TEMP 19 out |
RX 2 peltier-block |
OUT |
| 6 |
TEMP 19 in |
|
IN |
| 7 |
TEMP 20 out |
RX 2 cold-load |
OUT |
| 8 |
TEMP 20 in |
|
IN |
CON3 Temperature Monitor
CON3 provides four inputs for NTC-Temperature-Sensors. Connect only the temperature-sensor which belongs to the described measurement point. This is necessary for a correct function of the RMC. If you don't need a measurement point, leave it open. But be careful, if you use a reflector heater. Here you have to connect at least the reflector heater box temperature-sensor because of the RMC temperature control.
| 1 |
TEMP 9 out |
RX 2 reference load |
OUT |
| 2 |
TEMP 9 in |
|
IN |
| 3 |
TEMP 10 out |
RX 2 noise source |
OUT |
| 4 |
TEMP 10 in |
|
IN |
| 5 |
TEMP 11 out |
RX 2 peltier-block |
OUT |
| 6 |
TEMP 11 in |
|
IN |
| 7 |
TEMP 12 out |
RX 2 cold-load |
OUT |
| 8 |
TEMP 12 in in |
|
IN |
CON4 Temperature Monitor
CON4 provides four inputs for NTC-Temperature-Sensors. Connect only the temperature-sensor which belongs to the described measurement point. This is necessary for a correct function of the RMC. If you don't need a measurement point, leave it open. But be careful, you have to connect at least the temperature-sensor for the RX 1 reference load because of the RMC temperature control.
| 1 |
TEMP 1 out |
RX 1 reference load |
OUT |
| 2 |
TEMP 1 in |
|
IN |
| 3 |
TEMP 2 out |
RX 1 noise source |
OUT |
| 4 |
TEMP 2 in |
|
IN |
| 5 |
TEMP 3 out |
RX 1 peltier-block |
OUT |
| 6 |
TEMP 3 in |
|
IN |
| 7 |
TEMP 4 out |
RX 1 cold-load |
OUT |
| 8 |
TEMP 4 in |
|
IN |
CON7 Temperature Monitor
CON7 provides four inputs for NTC-Temperature-Sensors. Connect only the temperature-sensor which belongs to the described measurement point. This is necessary for a correct function of the RMC. If you don't need a measurement point, leave it open.
| 1 |
TEMP 21 out |
RX 2 waveguide to cold-load |
OUT |
| 2 |
TEMP 21 in |
|
IN |
| 3 |
TEMP 22 out |
RX 2 test-port to cold-load |
OUT |
| 4 |
TEMP 22 in |
|
IN |
| 5 |
TEMP 23 out |
RX 2 waveguide-switch and coupler |
OUT |
| 6 |
TEMP 23 in |
|
IN |
| 7 |
TEMP 24 out |
RX 1 cold-load |
OUT |
| 8 |
TEMP 24 in |
|
IN |
CON8 Temperature Monitor
CON8 provides four inputs for NTC-Temperature-Sensors. Connect only the temperature-sensor which belongs to the described measurement point. This is necessary for a correct function of the RMC. If you don't need a measurement point, leave it open. But be careful, if you have connected a heater for feed-horn or for reflector, connect these temperature-sensors because of the RMC temperature control.
| 1 |
TEMP 13 out |
Feed-horn |
OUT |
| 2 |
TEMP 13 in |
|
IN |
| 3 |
TEMP 14 out |
Reflector |
OUT |
| 4 |
TEMP 14 in |
|
IN |
| 5 |
TEMP 15 out |
RX 2 waveguide-switch and coupler |
OUT |
| 6 |
TEMP 15 in |
|
IN |
| 7 |
TEMP 16 out |
|
OUT |
| 8 |
TEMP 16 in |
|
IN |
CON9 Temperature Monitor
CON9 provides four inputs for NTC-Temperature-Sensors. Connect only the temperature-sensor which belongs to the described measurement point. This is necessary for a correct function of the RMC. If you don't need a measurement point, leave it open.
| 1 |
TEMP 5 out |
RX 1 waveguide to cold-load |
OUT |
| 2 |
TEMP 5 in |
|
IN |
| 3 |
TEMP 6 out |
RX 1 test-port to cold-load |
OUT |
| 4 |
TEMP 6 in |
|
IN |
| 5 |
TEMP 7 out |
RX 1 waveguide-switch and coupler |
OUT |
| 6 |
TEMP 7 in |
|
IN |
| 7 |
TEMP 8 out |
CPU |
OUT |
| 8 |
TEMP 8 in |
|
IN |
CON5 DC Voltage Monitor
CON 5 provides a DC Voltage Monitor for all necessary voltages a radiometer need. Normally all monitored voltages are needed to operate a radiometer and every input must not be unconnected.
| 1 |
+24V ext |
Limits +25V/+21V |
IN |
| 2 |
GND +24V ext |
|
IN |
| 3 |
+28V |
Limits +29V/+25V |
IN |
| 4 |
GND +28V |
|
IN |
| 5 |
+12V/+15V |
Limits +16V/+10V |
IN |
| 6 |
GND +12V/+15V |
|
IN |
| 7 |
+24V/+48V |
Limits +51V/+21V |
IN |
| 8 |
GND +24V/+48V |
|
IN |
| 9 |
-12V/-15V |
Limits -16V/-10V |
IN |
| 10 |
GND -12V/-15V |
|
IN |
| 11 |
+5V |
Limits +5,5V/+4,4V |
IN |
| 12 |
GND +5V |
|
IN |
CON6 Serial Interfaces
The RMC owns one serial interfaces to control the RMC from remote where the TCP/IP remote control is not usable. This interface may be configured to work as a RS232 or RS485 2-wire mode/RS422 4-wire mode interface by jumpers inside the RMC.
| 1 |
RS232 TX |
RS232 for remote control |
OUT |
| 2 |
RS232 RX |
RS232 for remote control |
IN |
| 3 |
GND |
|
|
| 4 |
RS485/422 TX+ |
RS485/RS422 for remote control |
IN |
| 5 |
RS485/422 TX- |
RS485/RS422 for remote control |
OUT |
| 6 |
RS485/422 RX+ |
RS485/RS422 for remote control |
IN |
| 7 |
RS485/422 RX- |
RS485/RS422 for remote control |
OUT |
| 8 |
GND |
|
IN |
The RMC is factory preset to use the RS232 interface. To change the interface configuration, set the jumpers on the RMC main board above CON6 according to the illustration below:
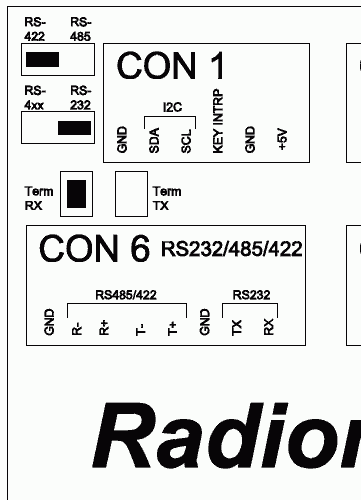 --- Jumper for configuration of serial interface
There is one jumper to select between RS4xx and RS232 interface driver. Put the jumper to position RS-232 (right) to select the RS232 interface.
The second jumper switches between the RS422 4-wire mode and RS485 2-wire mode. To select RS485 2-wire mode put the jumper to position RS-485 (right). Use the TX data lines (CON6 Pins 4, 5) in this mode.
Term RX and Term TX activate 100 Ohms termination resistors between the RS422 data lines. The lines are terminated if the jumper is set.
X1/X2 DC-Voltage input from Radiometer Detector
X1 and X2 are SMA-connectors for the DC-voltage from the Radiometer Detector. There are two connectors for three RX-channels. Connector X2 is for the channel 1 and connector X1 is for the channel 2 and channel 3. So channel 2 can handle two input signals. The voltage range is between 0V and +5V. Every input has input high impedance and provides a sample&hold filter to improve measurement results. See also chapter Theory of Operation for details.
| X1 |
RX channel 2; 0V..+5V input voltage range |
IN |
| X2 |
RX channel 1; 0V..+5V input voltage range |
IN |
CON12 Power Supply
At CON12 the power supply for the RMC itself (pins 1, 2) and fort the external devices must be connected. For operation two different power supplies are needed, one for the RMC itself and one for the external devices like the waveguide-switches or the antenna motor control. Also see chapter Power Supply Cabling for the concept of separate intern / extern power supplies the RMC uses.
| 1 |
+24V RMC |
Power supply for the RMC and the position encoders |
IN |
| 2 |
GND RMC |
|
IN |
| 3 |
+24V EXT |
Power supply for waveguide-switches, antenna motor control, end switches, heater and blower control and temperature control |
IN |
| 4 |
GND EXT |
|
IN |
CON19 Redundant Power Supply
CON19 is to connect a redundant power supply for the RMC and for the external devices. For a redundant power supply system you have to connect four power supplies.
| 1 |
Red. +24V RMC |
Redundant power supply for the RMC and the position encoders |
IN |
| 2 |
Red. GND RMC |
|
IN |
| 3 |
Red. +24V EXT |
Redundant power supply for waveguide-switches, antenna motor control, end switches, heater and blower control and temperature control |
IN |
| 4 |
Red. GND EXT |
|
IN |
CON20 Power Output
CON20 provides two clamps to the +24V external voltage rail and two clamps to the GND external voltage rail. This is for a easier external cabling.
| 1 |
+24V EXT |
Power Output +24V |
IN |
| 2 |
+24V EXT |
|
IN |
| 3 |
GND EXT |
Power Output GND |
IN |
| 4 |
GND EXT |
|
IN |
CON13 SSI Elevation Angle Encoder Interface
Below the pin out of a SSI type angle encoder interface board is shown. The RMC uses this modern high speed serial interface to readout the angle of Elevation (if present). The SSI angle encoder may be powered from the RMC internal power supply. +5V and +24V clamps are provided at the connector. To avoid ground loops, the cable shield should be connected either to pin 1 at the RMC or to the ground at the encoder housing, never at both ends.
| 1 |
GND |
|
OUT |
| 2 |
SSI-Data+ |
SSI data+ |
IN+ |
| 3 |
SSI-Data- |
SSI data- |
IN- |
| 4 |
SSI CLK+ |
SSI clock+ |
IN+ |
| 5 |
SSI CLK- |
SSI clock- |
OUT- |
| 6 |
|
|
|
| 7 |
+5V |
encoder power supply |
OUT |
| 8 |
+24V |
encoder power supply |
IN |
CON21 SSI Azimuth Angle Encoder Interface
Below the pin out of a SSI type angle encoder interface board is shown. The RMC uses this modern high speed serial interface to readout the angle of Azimuth and (if present). The SSI angle encoder may be powered from the RMC internal power supply. +5V and +24V clamps are provided at the connector. To avoid ground loops, the cable shield should be connected either to pin 1 at the RMC or to the ground at the encoder housing, never at both ends.
| 1 |
GND |
|
OUT |
| 2 |
SSI-Data+ |
SSI data+ |
IN+ |
| 3 |
SSI-Data- |
SSI data- |
IN- |
| 4 |
SSI CLK+ |
SSI clock+ |
IN+ |
| 5 |
SSI CLK- |
SSI clock- |
OUT- |
| 6 |
|
|
|
| 7 |
+5V |
encoder power supply |
OUT |
| 8 |
+24V |
encoder power supply |
IN |
CON14 Elevation Motor Controls
All signals for motor control are provided as free floating optocoupler inputs / outputs. This gives a maximum of flexibility to adapt the cabling to the motor driver units. They probably will combine one end of the control inputs to a common potential. The RMC is capable to control motor drivers with different polarity concepts.
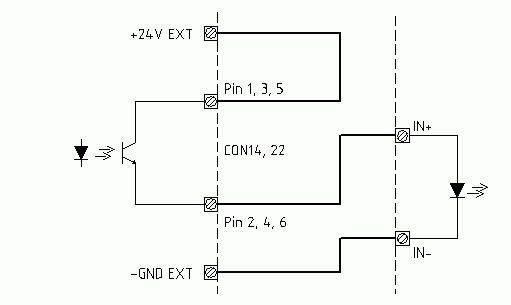 --- Example for wiring the motor drive signals
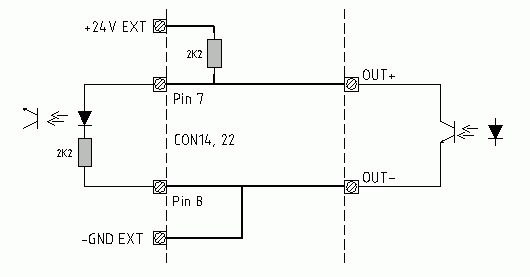 --- Example for wiring the motor status signals
| 1 |
EL FWD C |
Motor forward |
OUT+ |
| 2 |
EL FWD C |
|
OUT- |
| 3 |
EL REV C |
Motor rewind |
OUT+ |
| 4 |
EL REV E |
|
OUT- |
| 5 |
EL RESERVE C |
Reserve |
OUT+ |
| 6 |
EL RESERVE E |
|
OUT- |
| 7 |
EL FAULT A |
Fault |
IN+ |
| 8 |
EL FAULT K |
|
IN- |
CON22 Azimuth Motor Controls
All signals for motor control are provided as free floating optocoupler inputs / outputs. This gives a maximum of flexibility to adapt the cabling to the motor driver units. They probably will combine one end of the control inputs to a common potential. The RMC is capable to control motor drivers with different polarity concepts.
- --- Example for wiring the motor drive signals
- --- Example for wiring the motor status signals
| 1 |
AZ FWD C |
Motor forward |
OUT+ |
| 2 |
AZ FWD C |
|
OUT- |
| 3 |
AZ REV C |
Motor rewind |
OUT+ |
| 4 |
AZ REV E |
|
OUT- |
| 5 |
AZ RESERVE C |
Reserve |
OUT+ |
| 6 |
AZ RESERVE E |
|
OUT- |
| 7 |
AZ FAULT A |
Fault |
IN+ |
| 8 |
AZ FAULT K |
|
IN- |
CON15 Waveguide-switch RX2
At CON15 the RMC provides a connection for a waveguide switch related to RX 2.
| 1 |
IND B |
Indication Pos B |
IN |
| 2 |
COM IND |
|
IN |
| 3 |
IND A |
Indication Pos A |
IN |
| 4 |
POS B |
Position B |
OUT |
| 5 |
COM POS |
|
OUT |
| 6 |
POS A |
Position A |
OUT |
 --- Example for wiring a waveguide switch
CON23 Waveguide-switch RX1
At CON15 the RMC provides a connection for a waveguide switch related to RX 1.
| 1 |
POS A |
Position A |
OUT |
| 2 |
COM POS |
|
OUT |
| 3 |
POS B |
Position B |
OUT |
| 4 |
IND A |
Indication Pos A |
IN |
| 5 |
COM POS |
|
IN |
| 6 |
IND B |
Indication Pos B |
IN |
 --- Example for wiring a waveguide switch
CON16 Blower and Heater
CON16 provide some outputs to control blowers and heaters in a radiometer. All signals are free floating optocoupler outputs for DC. This gives a maximum of flexibility to adapt the cabling to different blowers and heaters. For a connection with external devices please also take a look also to Elevation Motor Wiring.
| 1 |
BLW CASE E |
|
OUT |
| 2 |
BLW CASE C |
Blower for the radiometer case |
OUT |
| 3 |
BLW HORN E |
|
OUT |
| 4 |
BLW HORN C |
Blower for the horn antenna |
OUT |
| 5 |
BLW REFL E |
|
OUT |
| 6 |
BLW REFL C |
Blower for reflector |
OUT |
| 7 |
HEAT REFL E |
|
OUT |
| 8 |
HEAT REFL C |
Heater for reflector |
OUT |
| 9 |
HEAT HORN E |
|
OUT |
| 10 |
HEAT HORN C |
Heater for horn antenna |
OUT |
CON17 RX-Control
CON17 provide some outputs to control the components in a radiometer receiver (circulator, noise-diode, LO). The output voltage is TTL-compatible (0/5V). There are two equal sets of output signals.
| 1 |
GND |
|
OUT |
| 2 |
ND RX2 |
Noise-diode control receiver 2 |
OUT |
| 3 |
LO- RX2 |
Local oscillator control receiver 2 |
OUT |
| 4 |
LO+ RX2 |
Local oscillator control receiver 2 |
OUT |
| 5 |
CIRC- RX2 |
Circulator control receiver 2 |
OUT |
| 6 |
CIRC+ RX2 |
Circulator control receiver 2 |
OUT |
| 7 |
+5V |
Supply Voltage |
OUT |
| 8 |
ND RX1 |
Noise-diode control receiver 1 |
OUT |
| 9 |
LO- RX1 |
Local oscillator control receiver 1 |
OUT |
| 10 |
LO+ RX1 |
Local oscillator control receiver 1 |
OUT |
| 11 |
CIRC- RX1 |
Circulator control receiver 1 |
OUT |
| 12 |
CIRC+ RX1 |
Circulator control receiver 1 |
OUT |
| 13 |
GND |
|
OUT |
| 14 |
ND VOLTAGE |
Voltage input for the two noise-diodes |
OUT |
Pin 14 is an input for the noise-diode voltage. If you use a noise-diode with +28V you have to connect an external voltage here. If you use a noise-diode with +5V you can connect pin 14 to pin 7. However, for a correct function of the noise-diode control signal you have to connect a voltage.
CON24 End Switches
CON24 provides the end switches for the antenna control unit. The end switch inputs internally are connected to the external 24V / GND rails. The switches are connected directly to the input pairs without any external ground or supply cabling. The RMC treats closed contact as OK; contacts have to be opened to indicate the 'limit reached' condition.
There is also the feedback input for manual control with a handheld. The RMC treats closed contact as handheld connected.
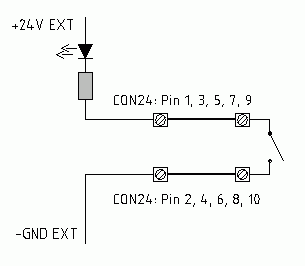 --- Example for wiring the limit switches and the handheld
| 1 |
EL LOW |
Lower limit Elevation |
IN |
| 2 |
GND EXT |
|
IN |
| 3 |
EL HIGH |
Upper limit Elevation |
IN |
| 4 |
GND EXT |
|
IN |
| 5 |
AZ LOW |
Azimuth left limit (view from behind antenna) |
IN |
| 6 |
GND EXT |
|
IN |
| 7 |
AZ HIGH |
Azimuth right limit (view from behind antenna) |
IN |
| 8 |
GND EXT |
|
IN |
| 9 |
MNL CTRL |
Manual Control feedback |
IN |
| 10 |
GND EXT |
|
IN |
CON25 Pressure Pump
CON25 provides a input and a output to connect a pressure pump. All signals are free floating optocoupler outputs for DC. This gives a maximum of flexibility to adapt the cabling to different pressure pumps. Actually you can switch on the pump and read out a fault.
| 1 |
PUMP E |
|
OUT |
| 2 |
PUMP C |
Switch on Pressure Pump |
OUT |
| 3 |
FAULT A |
Fault feedback |
IN |
| 4 |
FAULT K |
|
IN |
CON26 Temp.-Control
CON26 provides outputs to control the temperature in the receiver case. All signals are free floating optocoupler outputs for DC. This gives a maximum of flexibility. For a connection with external devices please also take a look also to Elevation Motor Wiring.
| 1 |
COOL E |
|
OUT |
| 2 |
COOL C |
Cool Signal |
OUT |
| 3 |
HEAT E |
|
OUT |
| 4 |
HEAT C |
Heat Signal |
OUT |
| 5 |
FAULT A |
Fault Feedback |
IN |
| 6 |
FAULT K |
|
IN |