The sat-nms VioIP (video over IP) Software is an extension to the sat-nms M&C software which permits to manage video over IP transmissions in a given IP network. The software manages resources like the bandwidth of connections between two nodes of the network or the usage of endpoint devices.
The sat-nms VioIP Software consists of an extension to the sat-nms M&C server with the resource database, the VioIP Client Application which is used to start or stop transmissions and finally the VioIP Network Configuration Application which permits to add or delete locations, endpoint devices or data lines between the locations. The following paragraphs describe the VioIP Client Application.
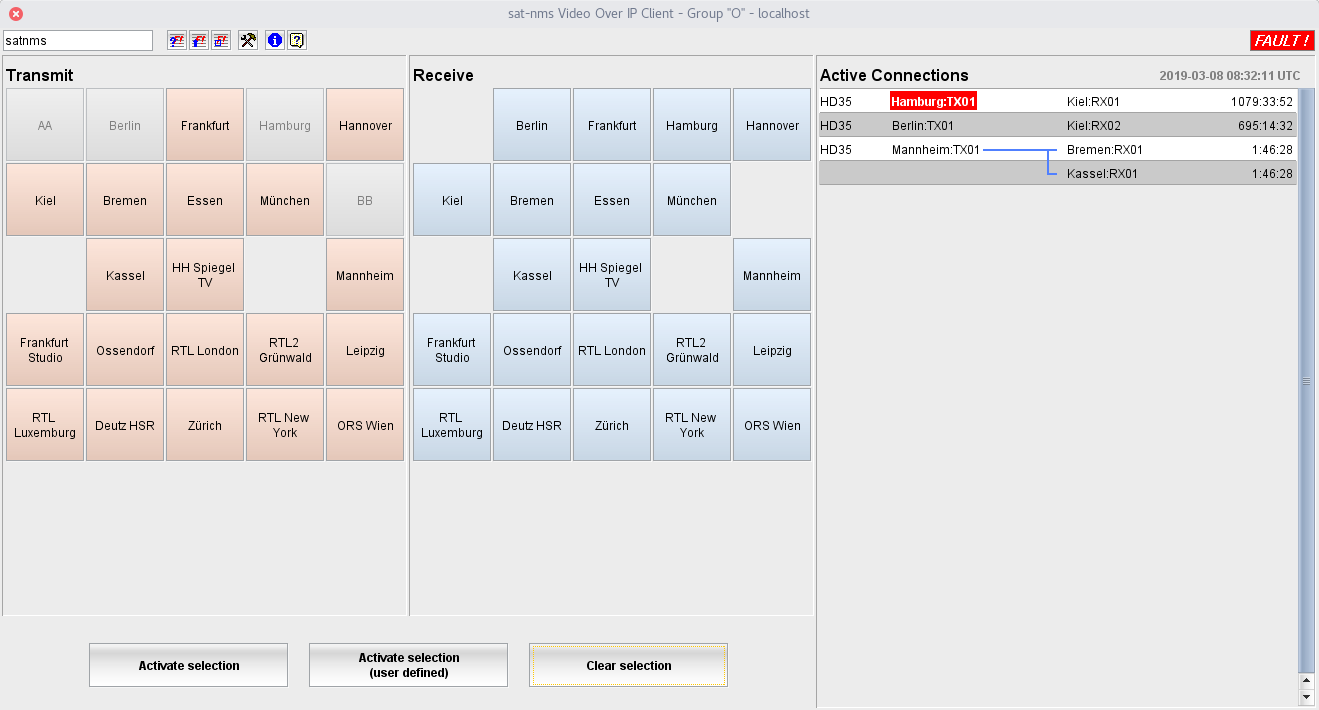
The VioIP Client Application window consists of three major parts: The TX location button array, the RX location button array and the list of active connections. At the top of the window there is a tool bar giving access to some global functions of the sat-nms software.
TX location button array
The array of TX locations shows one button for each location defined in the software which has at least one TX end point device configured. The button array is used to select the source of a connection to be started.
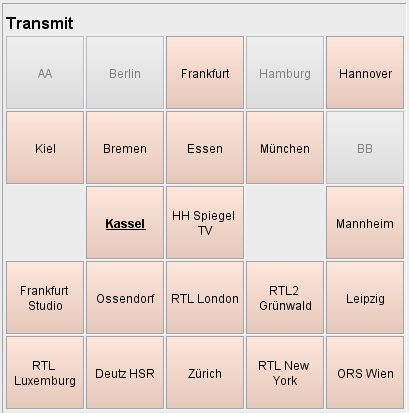
If there are no devices available to start a new connection from a particular location (because all devices are either in use, temporarily disabled or in communication fault state), the button is grayed out and cannot be pressed.
To select a location simply click the button. The name of the selected location prints bold/underlined to signal that this location is selected as the source for the connection to be started next. Only one TX location may be selected at a time, to change the selected TX location simply click another one. The selection mark then moves to this location. To unselect a location, click the selected location again or click the "Cancel selection" button below the button arrays.
RX location button array
The array of RX locations shows one button for each location defined in the software which has at least one RX end point device configured. The button array is used to select the destination(s) of a connection to be started.
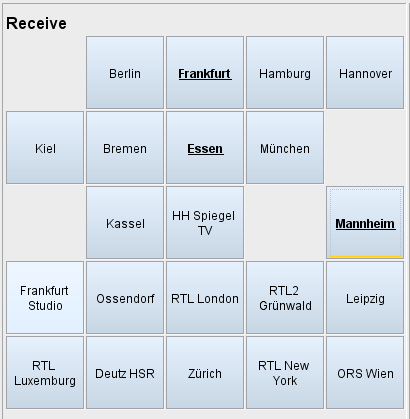
If there are no devices available to start a new connection to a particular location (because all devices are either in use, temporarily disabled or in communication fault state), the button is grayed out and cannot be pressed.
Using the RX location buttons is much like for the TX side, however the RX button array lets you multiple destination. Selecting more than one destination for an upcoming connection switches the operating mode to "multicast" which will send the program from the source location to all selected destinations.
Active connection list
The active connection list shows all active connection as a scrollable list, one connection per line. For each connection the video profile, the source (location and device) and the destination of the connection are shown. The last column shows the time how long this connection already is active.
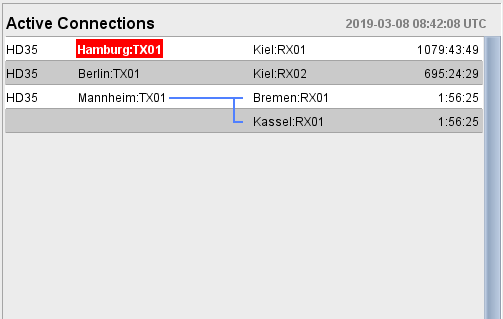
Multicast groups are symbolized with blue lines, connecting one source to one or more destinations. If an end point device shows a fault while the connection is active, the name of the end point is drawn as white text on red background. Please note, that not all faults of the device are signalled in this way. In the logical VioIP-End-Point Device the faults are defined which are to be monitored while the connection is running.
Beside as a status display, the Active Connections list is used to protect, to un-protect and to stop running connections. Clicking with the right mouse button on a connection in the list shows a context menu which gives you several options, depending on the actual state of the connection. Below on this page you find paragraphs which describe elaborately how to terminate, protect or un-protect connections.
Tool bar buttons
The VioIP Client provides a toolbar at the top of the window which gives access to a number of global functions in the software. Below there is a short description for each of the toolbar buttons.
 --- The left field at the window's tool-bar shows the login-name of the user who is actually logged in. You may click with the mouse to this field, the program pops up the login/logout dialog.
 --- Opens the Event Report window .
 --- Opens the Live Event Log window .
 --- Opens a list of currently active faults.
 --- Opens the VioIP Network Configuration Application . This application lets you add or remove locations, end points, data lines an more. You must be logged as a user with privilege level 150 to use this function.
 --- Shows the program version info.
 --- Shows this help page.
Starting a connection
Starting a connection is straight forward, using the "Location Buttons" of the GUI. Click to a TX location and then to a RX location, finally click the "Activate selection" button below and the software starts a unicast connection between these locations. It uses the first available end point device at either location and the default video profile (bandwidth) for this.
You may select multiple RX locations by clicking the buttons in the RX location button array. In this case the software automatically uses multicast to transmit the program from the TX location simultaneously to all selected destinations.
If you accidentally selected an RX location, click it again to deselect it. This must be done before you activate the selection.
Terminating a connection
To terminate a connection click to the connection in the list with the right mouse button and select "Stop this connection" from the context menu popping up. With multicast connections there is also an option "Stop all connections of this multicast group".
Stopping a unicast connection means to turn off the transmission, switching all devices to stand-by and finally freeing the resources occupied by this connection (endpoint devices and used bandwidth). The same applies when stopping all connections of a multicast group or when stopping the very last connection of a multicast group.
Stopping a single connection from a multicast group means - unless this is the very last connection of this group which is still running - to switch of the receiver, freeing this as a resource and freeing the bandwidth which was used to send the signal to particularly this receiver.
Protecting a connection
Running connections may be protected from accidentally being terminated. Protected connections cannot be terminated directly, the protection must be removed before the connection can be terminated. Protected connections appear with a yellow colored background in the connection list.
To protect a connection, click to the connection in the list with the right mouse button and select "Protect this connection" from the context menu popping up. With multicast connections there is also an option "Protect all connections of this multicast group"
To remove the protection from a connection, click to the protected connection in the list with the right mouse button and select "Unprotect this connection" from the context menu popping up. With multicast connections there is also an option "Unprotect all connections of this multicast group"
Specifying end point devices explicitly
When starting a connection as described above, the software automatically selects the first available end point device at the selected location. You can explicitly specify the end point device to be used for a connection.
For this instead of left-clicking the location button use the right mouse button to show the context menu of the location button. Select the end point device of your choice from this menu.
Using a non-standard video profile / data rate
Connection which are established with the button "Activate selection" all use the default video profile and the bandwidth associated with this profile. The default profile is the first profile in the list of video profiles.
Using the button "Activate selection (user defined)" instead opens a dialog which lets you select a video profile from a list. This dialog also permits to set the "comment" property of a connection directly when the connection gets started.
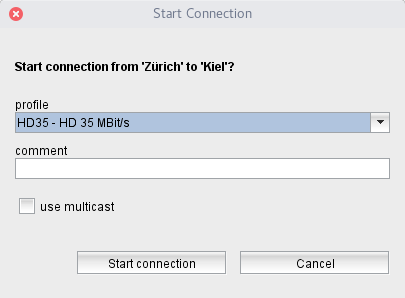
Starting a multicast connection to a single destination
Using the "Activate selection (user defined)" button and the dialog window appearing with a click to this button, you may also start a connection to a single destination in multicast mode. To do this, set the check mark "use multicast" before clicking "Start connection".
Other functions
You may check the route, the software calculates for connections between two locations: Select a source location in the TX button array and then right-click the destination in the RX button array and select "Show route to here". The program displays a pop up window with the route.
You may check the devices and outgoing lines for a location: Right-click the location button and select "Show location properties". The program displays a pop up window with requested information.