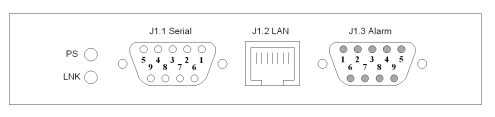
The Alarm and data connectors of the sat-nms LFTX/RX chassis all are located at the rear side of the enclosure up right. The figure below illustrates the location of the connectors and the pin out.
To meet mentioned EMC standards, use double shielded twisted pair CAT7 S/FTP Network cable, e.g. DRAKA UC900 SS27 Cat.7 PUR, for connecting network, serial and alarm interfaces. Ensure that the shield is connected properly.
The LED PS shows the presence of one or two power supply(ies). The LNK LED turns on, when there is some traffic on the LAN, the chassis is connected to.
To release the MNC board, open the screws with which the card is fixed at the mounting rail. Now turn in the screw into the screw thread beside to push the card out of its socket. After that you can pull the card out of the unit.
To install the MNC board again, put it into the slide rail until the front plate of the card contacts the mounting rail. Please pay attention: The board has to slide in smoothly. If not, pull the card out and try again. Otherwise the connectors on the MNC board or on the backplane might be damaged. After that fix the card with the provided screws to ensure a proper contacting of the connectors on the MNC board with the connectors on the backplane.
J1.1 Alarm connector
Dry alarm relay contacts represent a summary fault state of the unit. Both relays do switch parallel and show always the same state.
| Pin | Alarm contacts (DSUB-9 male) | Description |
|---|---|---|
| 1 | NC1 | closed if ok, open in fault state |
| 2 | COM1 | common for fault relay 1 |
| 3 | NO1 | open if ok, closed in fault state |
| 4 | +5VDC internal | |
| 5 | GND internal | |
| 6 | NC2 | closed if ok, open in fault state |
| 7 | COM2 | common for fault relay 2 |
| 8 | NO2 | open if ok, closed in fault state |
| 9 | GND internal |
J1.3 Serial connector
| Pin | RS232 serial interface (DCE) (DSUB-9 female} |
|---|---|
| 1 | not connected |
| 2 | TxD (output) |
| 3 | RxD (input) |
| 4 | not connected |
| 5 | GND |
| 6 | not connected |
| 7 | RTS |
| 8 | CTS |
| 9 | not connected |
J1.2 Network Connector