After having connected the ACU to a power supply and set the ACU’s IP
address, you can access the ACU’s user interface. To do this, start your
favorite web browser program (Internet Explorer, Netscape Navigator,
Opera or what else program you prefer). At the address field, where you
normally enter the URL of a web page you want to see, type in the IP
address of the sat-nms ACU you want to
control.
The ACU shows a web page consisting of a navigation bar at the left
side of the browser window and the actual antenna pointing in the main
part of the window. The readings automatically refresh once a second.
(this may be adjusted on the setup-page).
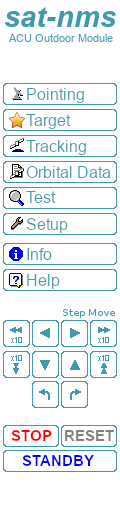
The navigation bar at the left contains a couple buttons which build
the ACU’s main menu:
keys.png
Pointing : This button switches back to the main
page you already see when you connect to the ACU. This page displays the
actual antenna pointing together with some status information. You also
use this page to move the antenna to a certain pointing given as azimuth
/ elevation values.
Target : By clicking to this button you switch
to the ‘Target’ page where you can store and recall the antenna pointing
for up to 200 satellites.
Orbital Data : By clicking to this button you
switch to two pages where you can store and recall up to 99 sets of TLE
ephemeris data and 99 sets if I11 satellite data. At the Tracking page you can assign TLE/I11 data sets to the
satellite to be tracked.
Tracking : sat-nms
ACUs with the tracking option installed offer the tracking mode and
tracking fine tune parameters on this page.
Test : By clicking to this button you switch to
the ‘Test’ page. The ‘Test’ page shows the low level I/O signals of the
ACU. It helps you to install the ACU or to identify a malfunction of
peripheral components.
Setup : This button switches to the ‘Setup’ page
which lets you inspect or change less common parameters which usually
are set only once to adapt the ACU to it’s working environment.
Info : After a mouse click to this button, the
ACU outdoor module shows a table with information like the serial number
of the device or the revision ID and compilation date of the
software.
Help : Clicking to this button shows the on-line
version of this user manual
Step Move : Clicking to the buttons in this area
moves the antenna a small step to the indicated direction. For azimuth
and elevation ‘small step’ and ‘large step’ buttons are provided. A
‘small step’ is the angle defined with the ‘XX step delta’ parameters at
the Setup page, a ‘large step’ is ten times this
value. With the polarization axis, steps always are 1°.
STOP : Clicking to the STOP button immediately
stops all motors. The ACU indicates a fault. A click to the RESET button
releases this fault.
RESET : The RESET button lets the ACU acknowledge
any motor diver faults by activating the reset-circuit to the motor
drivers for 800 msec. All faults internally latched by the ACU are
cleared and the target pointing values are set to the values actually
read from the position sensors.
STANDBY : The STANDBY button puts the pointing loop
of all axes to ‘standby’ mode: Differences between measured and
commanded value do not cause the motors to be driven in this mode.
Standby mode can be used for maintenance purposes or to move the antenna
by actuating the frequency inverters directly by hardware circuits. To
leave standby mode, click the STANDBY button again or RESET.