
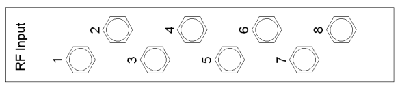
On the rear side you can find the RF-connectors left hand. On the left side the L-Band output connectors are located, on the right side of these connectors you can find the RF-input connectors.
In the standard configuration all RF-connectosr are SMA/ 50Ohm female connectors. If you need other connectors e.g. BNC or F or an 75Ohm impedance, contact us, we are able to offer the corresponding adaptors and inpedance transformers.
Switch- and Distribution-boards
With these two types of boards, the L-Band switch Matrix is realized. On the back side of the L-Band Switch Matrix you find the Switch-boards, on the front side (when the Frontpanel is opened) you can see the Distribution boards. How they work together is described in chapter Theory of Operation .
These boards are hot-plugable, so they are able to be changed while the L-Band switch matrix is working.
Switch Board
The switch board switches the selected RF Input Signal to its RFout. The switch boards are available as 8-way, 16- way and 32 way version. Of every version there are 2 different cards avaliable: as you can see in the following pictures, the RFout connector is shifted. The internal build-up is the same, it is only to optimize the handling with the cards. If you mount them alternating, there is more space to handle the connectors. It is also possible to replace a type1 through a type2 card without any problems.

To release a switch board, open the srews with which the card is fixed at the mounting rail. Now turn in the screw into the screw thread beside to push the card out of its socket. After that you can pull the card out of the unit.
Please pay attention : Before installing a switch board, ensure that the MMBX plugs are all in the same direction, otherwise they may be damaged during the insertion-withdrawal operation. To install a switch-board,put it into the slide rail until the frontplate of the card contacts the mounting rail. The board has to slide in smoothly. If not, pull the card out and try again. Otherwise the connectors on the card edge might be damaged. After that fix the card with the provided screws to ensure a proper contacting of the connectors on the switch board with the connectors on the corresponding ports on the distribution boards.
| Connector | description |
|---|---|
| BPYin | This input is reserved for further extensions (e.g. a 64x64 Matrix). With a customized software it is possible to switch the signal that is supplied to this |
| RFout | The selected RF input Signal is switched to this connector |
A switch board displays the following states:
| {parameter} | description |
|---|---|
| PS | the green power supply LED switches on, as soon as the power supply of the card is working. |
| FLT | the red fault LED switches on, if a fault occurs on the internal RF circuit. |
Distribution board
The distribution board distributes the connected RF input signal to every connected switch board. These boards are available as 8-way, 16-way and 32-way version.
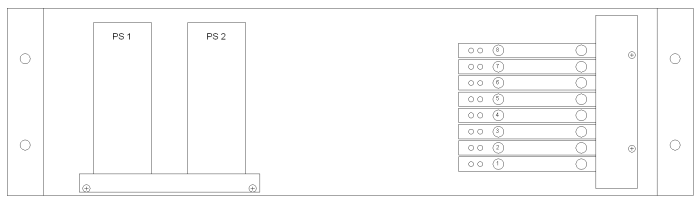
The picture above shows the view onto a 8x8 L-Band switch Matrix which frontplate is opened. On the left side you can see the power supplies, on the right side the distribution boards are installed. The installation order is from bottom (#1) to top (#8, #16 or #32).
ATTENTION : if you change a distribution board while the L-Band switch Matrix is running, the mains voltage is available on the power supplies!
The connectors of the L-Band inputs located on the rear panel of the matrix.
To remove a distribution board, open the 2 screws which with the metal bar, that holds the distribution boards in its position, is fixed. Remove the cable connected to the board that you want to remove. Now you can pull out the card carefully out of its slide.
To install a distribution board, put it into the slide rail until the card is in the same horizontal position as the others. The board has to slide in smoothly. If not, pull the card out and try again. Otherwise the connectors on the card edge might be damaged. After that fix the metal bar with the provided screws to ensure a proper contacting of the connectors on the distribution board with the connectors on the corresponding ports on the switch boards.
Every card contains 2 connectors:
| Connector | description |
|---|---|
| SMA beside the LEDs | RF input: the RF input signal to be distributed to the switch boards, has to be supplied here. |
| SMA on the right hand | Test output: on this connector the signal, supplied at the RF input connector, is provided here without attenuation. If not in use, terminate this output with a 50Ohm terminator. |
A distribution board displays the following states:
| {parameter} | description |
|---|---|
| green LED | the green power supply LED switches on, as soon as the power supply of the card is working |
| red LED | the red fault LED switches on, if a fault occurs on the internal RF circuit. |