2.6 Configuring the Optical Links
This chapter gives a short overview about some configuration parameters you want to set after you have installed the sat-nms LFTX/RX. A complete reference of all available setup parameters is given in chapter Setup Parameters .
Chassis and communication type
Select if a chassis is "Master", "Slave" or "Single" Unit. If the chassis is not used as a Single-Unit you have to set the communication-type (HTTP or RS232) and the address of the corresponding Unit (depending on communication type IP or RS232-address).
ATTENTION : If you use 2 sat-nms LFTX/RX in Master/Slave mode, you have at first to configure and establish the connection between the master and the slave unit before you do any additional configurations. Otherwise the settings can be over-written if the units in a undefined state like Master/Single, Single/Slave, Master/Master or Slave/Slave.
Read more about the Master/Slave mode in chapter Setup Parameters .
Redundancy
If your sat-nms LFTX/RX chassis is equipped with the redundancy-switching option (Hardware Option), you have choose between "auto", "manual" or "off" on the 'Setup' page.
- Auto switches in case of a LFTX or LFRX card automatically to the redundant card if an fault occurs.
- Manual make it possible to manually switch a faulty card to the redundant slot
- Off disables the redundancy switching.
There are in general four different redundancy configuration available. These is a factory setup and required different hardware.
- None (none) No Redundancy is installed all cards corresponding direct to the rear connectors.
- 2 x n:1 Redundancy(n=1..4) (intern, intern2) If the chassis is equipped with these redundancy enhancement, it is possible, to use slot 3 and/or slot 8 as redundant slots. Slot 3 is the redundant link for slot 1, 2, 4 and 5 ("left slot"). Slot 8 is the redundant link for slot 6, 7, 9 and 10 ("right slot"). If redundancy is configured to "off", you can use slot 3 and 8 as normal links. So it is e.g. possible to setup a redundant link with slot 1..5 and a non-redundant link with slot 6..10. If you want to setup a redundant optical link to a RX/TX antenna, you have to place the cards for the receive-link to slot 1...5 and the cards for transmit-link to slot 6...10 or vice-versa. As the redundant card only works in one direction, you have to use one redundant card for the receive chain and one for the transmit chain.
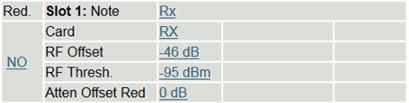
On the "Config" page of the unit, you have to select for each card if it should be integrated into the redundancy switching or not. In the first row of each card you can configure "Red." to "YES" or "NO". This means "YES" link should be switched to redundant link upon a fault or "NO" do not switch to redundant link upon a fault on this link. The mode "intern2" combines the left and right slots and perform always the same switching of of slot 1..5 and slot 6..10 and versa wise. This mode is helpful e.g. at LNBs with dual outputs.
- 2 x n:1 Redundancy(n=1..4) Extern (extern, extern2) This redundancy type acts in the same way as the above described, but uses external switched to perform the redundancy switching. The Chassis provides the controller interface for the switches.
- 5 x 1:1 Redundancy (int1to1) If the chassis is equipped with these redundancy enhancement, it is possible, to use slot 6 to 10 as redundant slots for slot 1 to 5.
Following conditions make the unit switch to the redundant link if configured to "auto"-Mode:
- optical power below 0.22mW on the LFRX-card
- RF power below configured threshold on LFRX card
please refer to Theory of operation for more detailed information.